


1. FILE UPLOAD TO BIM 360
1.1 SINGLE FILES
To upload one or more single files to BIM 360, go to the “Folders” tab in the BIM 360 Document Manager section, find the hub, the project and the folder where you want to upload the file(s), and click on the “Upload files” button.

1. Single files upload to BIM360.
A pop-up browser window will then appear in which you can select the file(s) you want to upload.
1.2 FILES WITH LINKED MODELS
If you want to upload the files to BIM 360 maintaining the link relationship that you have in Revit, you must go to the “Folders” tab in the BIM 360 Document Manager section and select the second option “Upload linked files”.
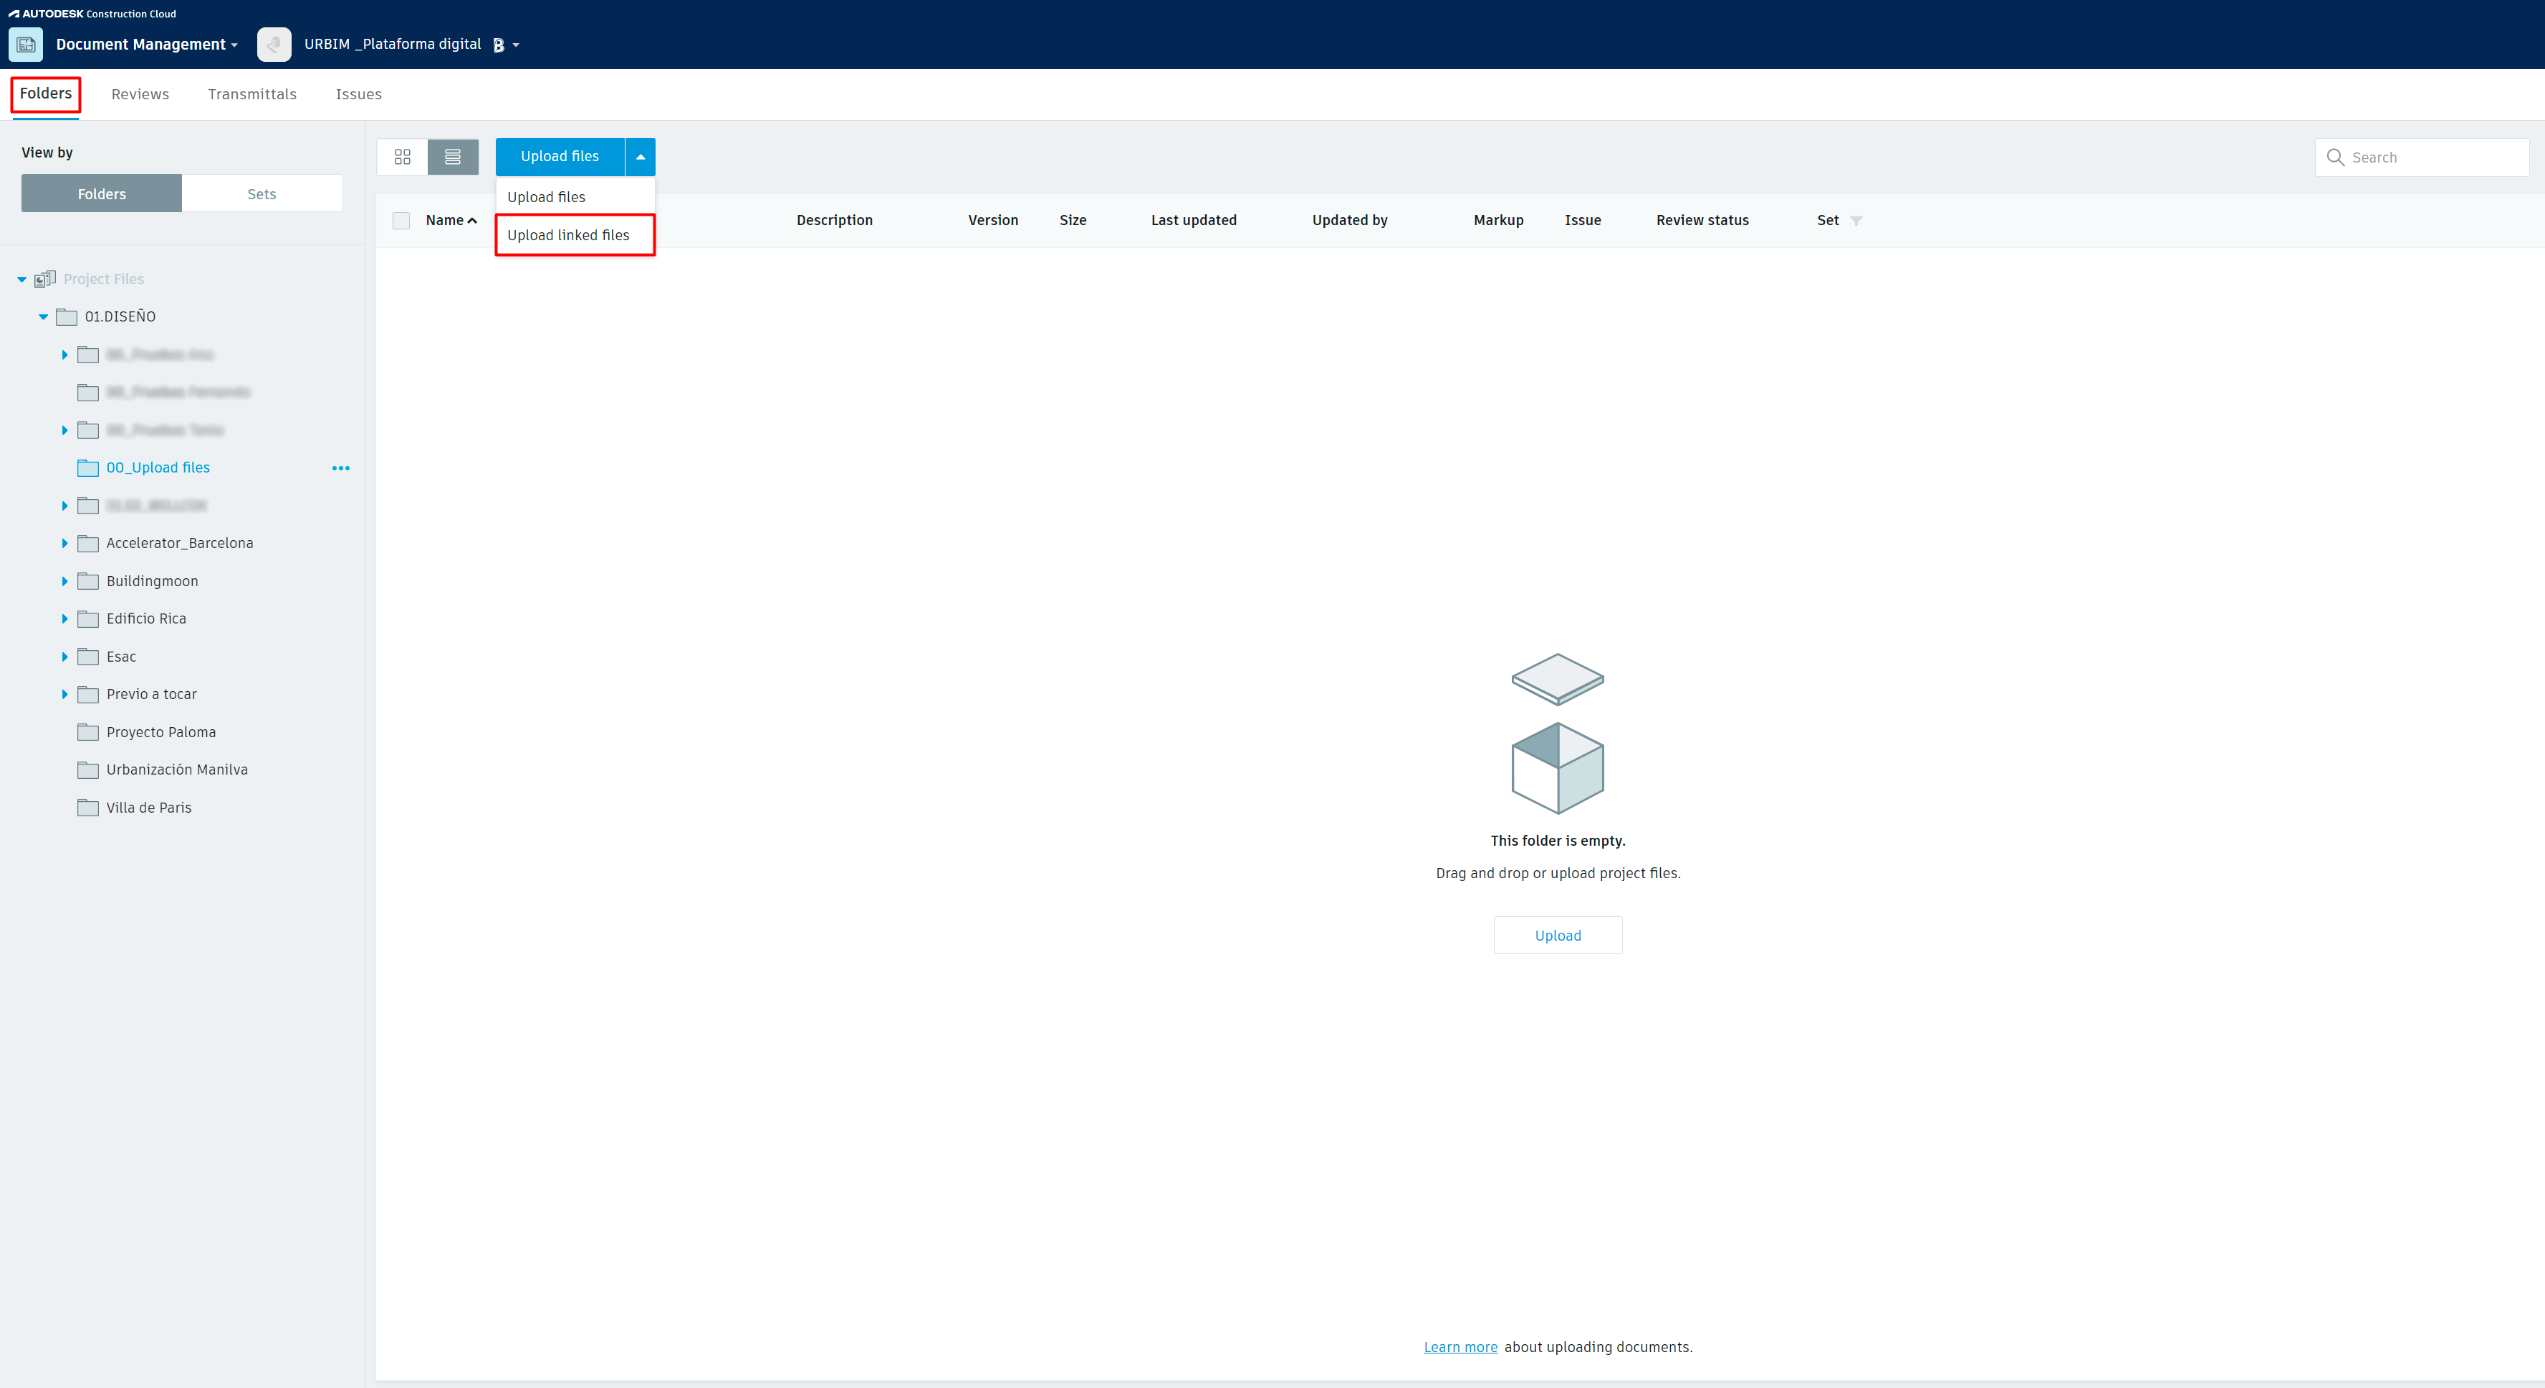
2. Uploading files with linked models to BIM360.
A pop-up browser window will appear in which we can choose all the files we want to upload. Select both the main file and the linked files.

3. Pop-up window for choosing files.
Once selected, we will see how they are loaded in the BIM 360 pop-up window. Once loaded, we can select which is the main file, to which the other ones are linked, and continue with the load.

We continue through the steps of the wizard and, once the upload is finished, we will be able to visualize our uploaded files correctly in the selected folder. If we open the main file in the BIM 360 viewer, we will see that the linked files are also loaded.
The linked files that are loaded in BIM 360 as single files as in the previous section instead of being loaded this way, will not be recognized as linked models in URBIM, and therefore will not be displayed in the viewer when clicking on the parent file. Thus, it will only be possible to visualize linked models in URBIM by either this type of loading, or the collaborative loading process explained in the following section.
2. FILE UPLOAD TO BIM 360 IN COLLABORATIVE MODE FROM REVIT
2.1 MODEL PUBLICATION
If you want to work collaboratively in BIM 360 and publish the models directly from Revit, the procedure to be followed is:
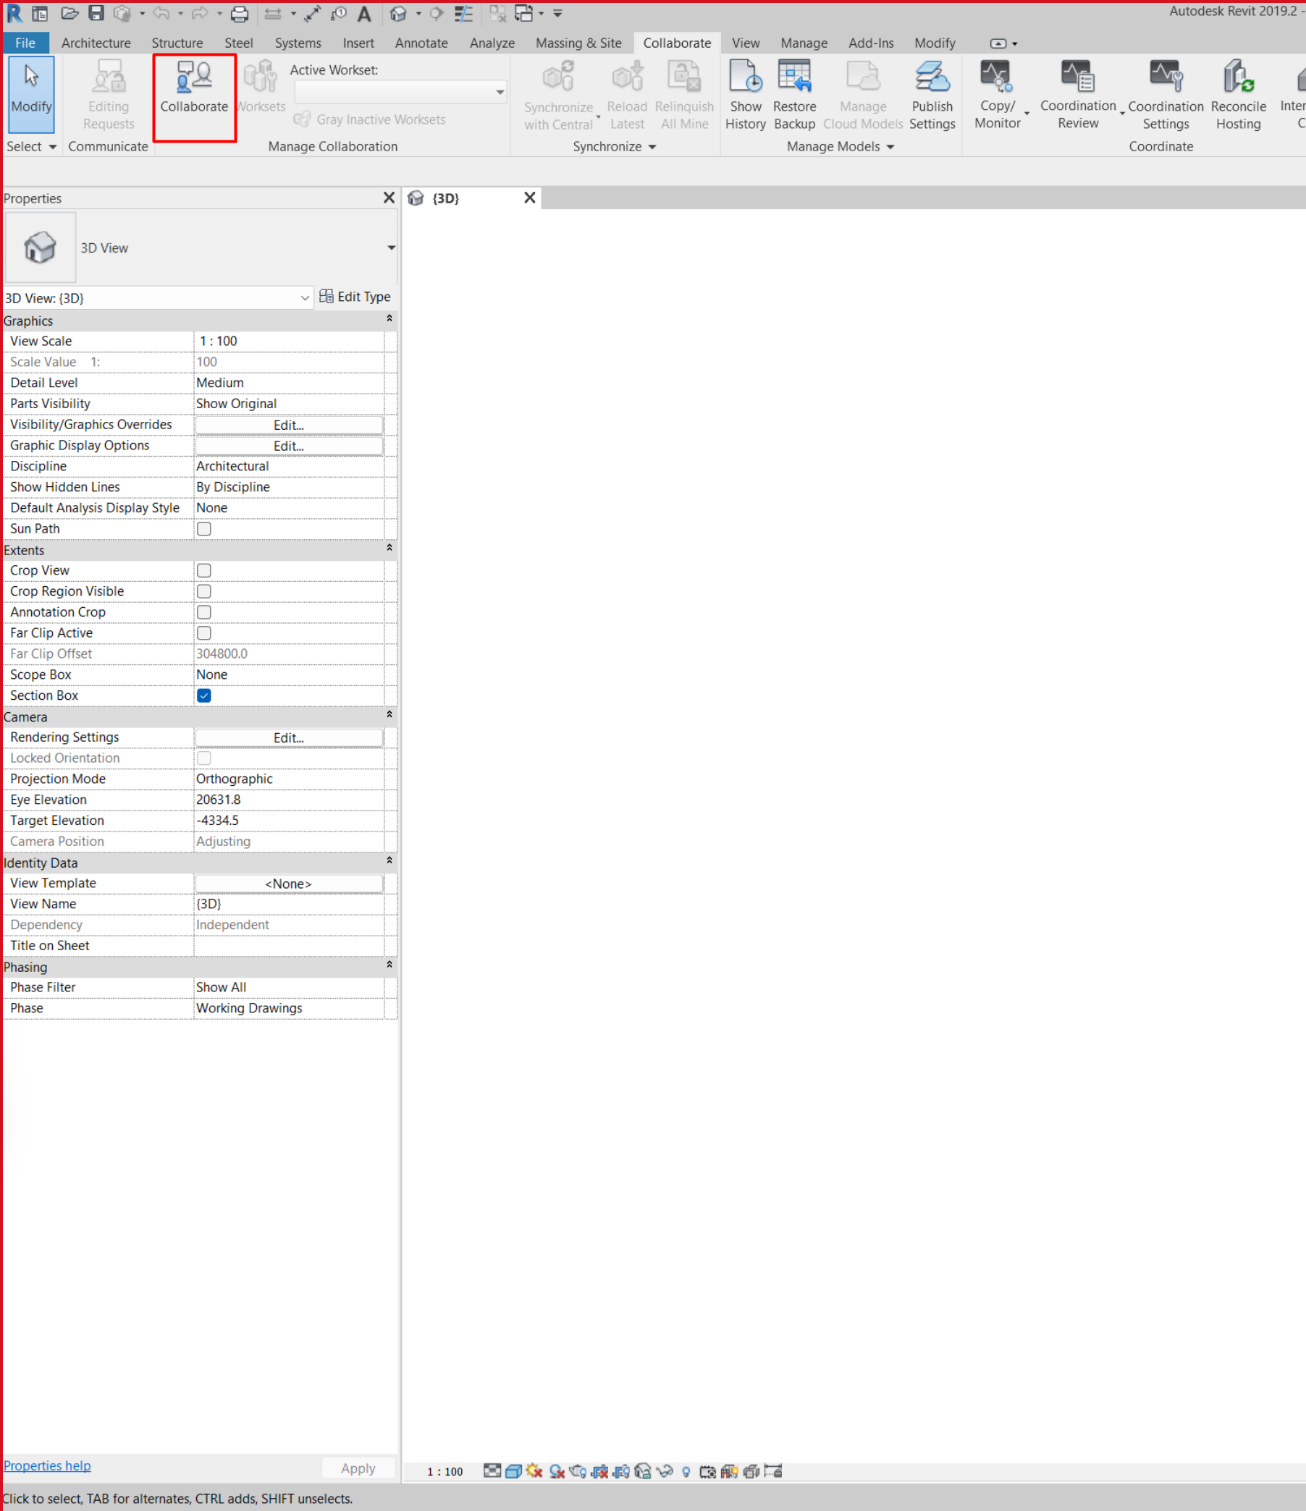 With the file to be shared open, from the “Collaborate” tab of Revit, in the “Manage collaboration” ribbon, select the “Collaborate” button to activate the collaborative work.
5. Collaborative work in Revit.
We choose the option to collaborate in BIM 360 so that the model is shared in the cloud and all project members with permissions can collaborate and keep track of the versions.
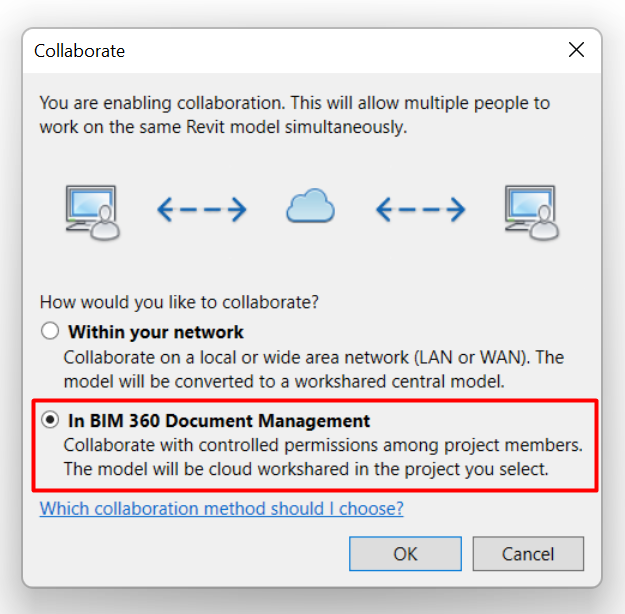
6. Connection to the BIM 360 cloud.
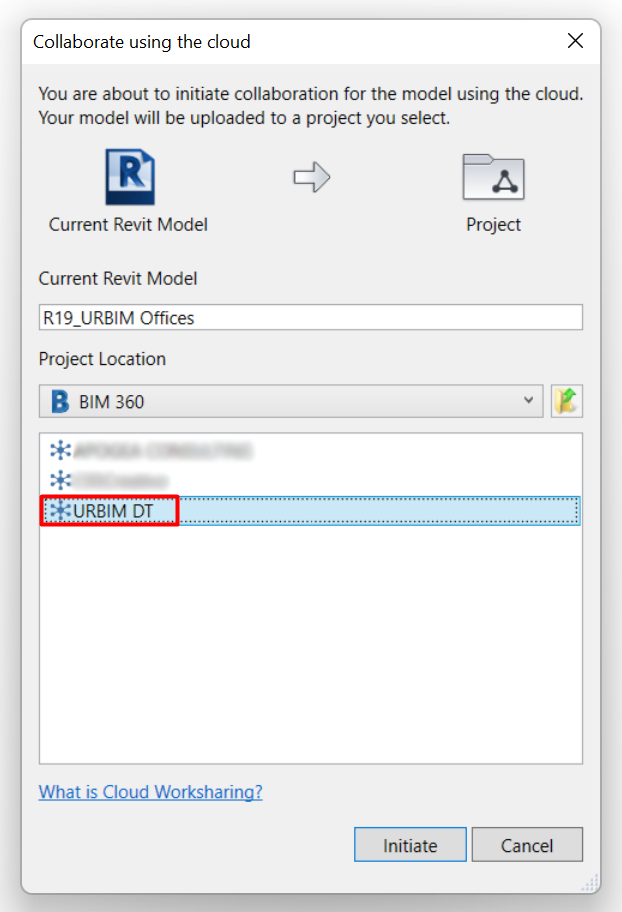
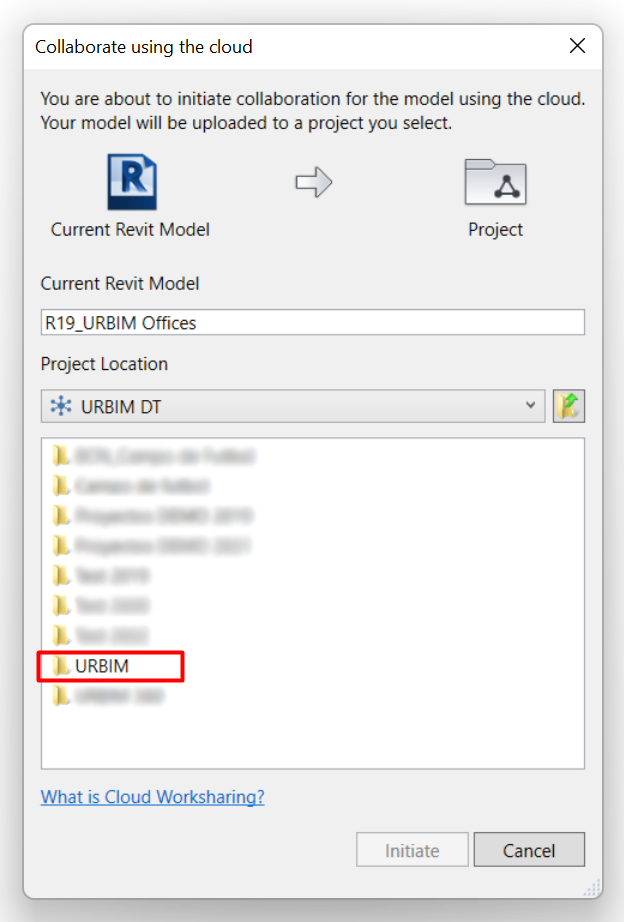
In the next step of the wizard, select the BIM 360 Hub, project and folder where you want to share the model.
7. BIM 360 hub and folder selection to upload the file to.

After a few minutes of processing and if the collaboration has been successfully initiated, the following pop-up window will appear:

8. BIM 360 collaboration successfully initiated.
From that moment on, we will be able to verify that the model and version published in the project and the selected hub, appear correctly in BIM 360.
*

9. Verification in BIM 360 that the collaboration has been successfully initiated.
* It is important to mention that the current version of URBIM does not consider the updating of model versions; that is, if the file is updated in BIM 360 and later versions are published, they will not be visible in URBIM once the project is created. It will be necessary to create a new project with the corresponding loss of data that this may entail.
Improvement of model modification management is a feature that URBIM continues to work on and is scheduled for release in future updates of the platform.
2.2 PLANS AND VIEWS PUBLICATION
In order to be able to correctly visualize the plans and views of the file uploaded in BIM 360 and, consequently, in the URBIM viewer, it is necessary to publish them from Revit using the following procedure:
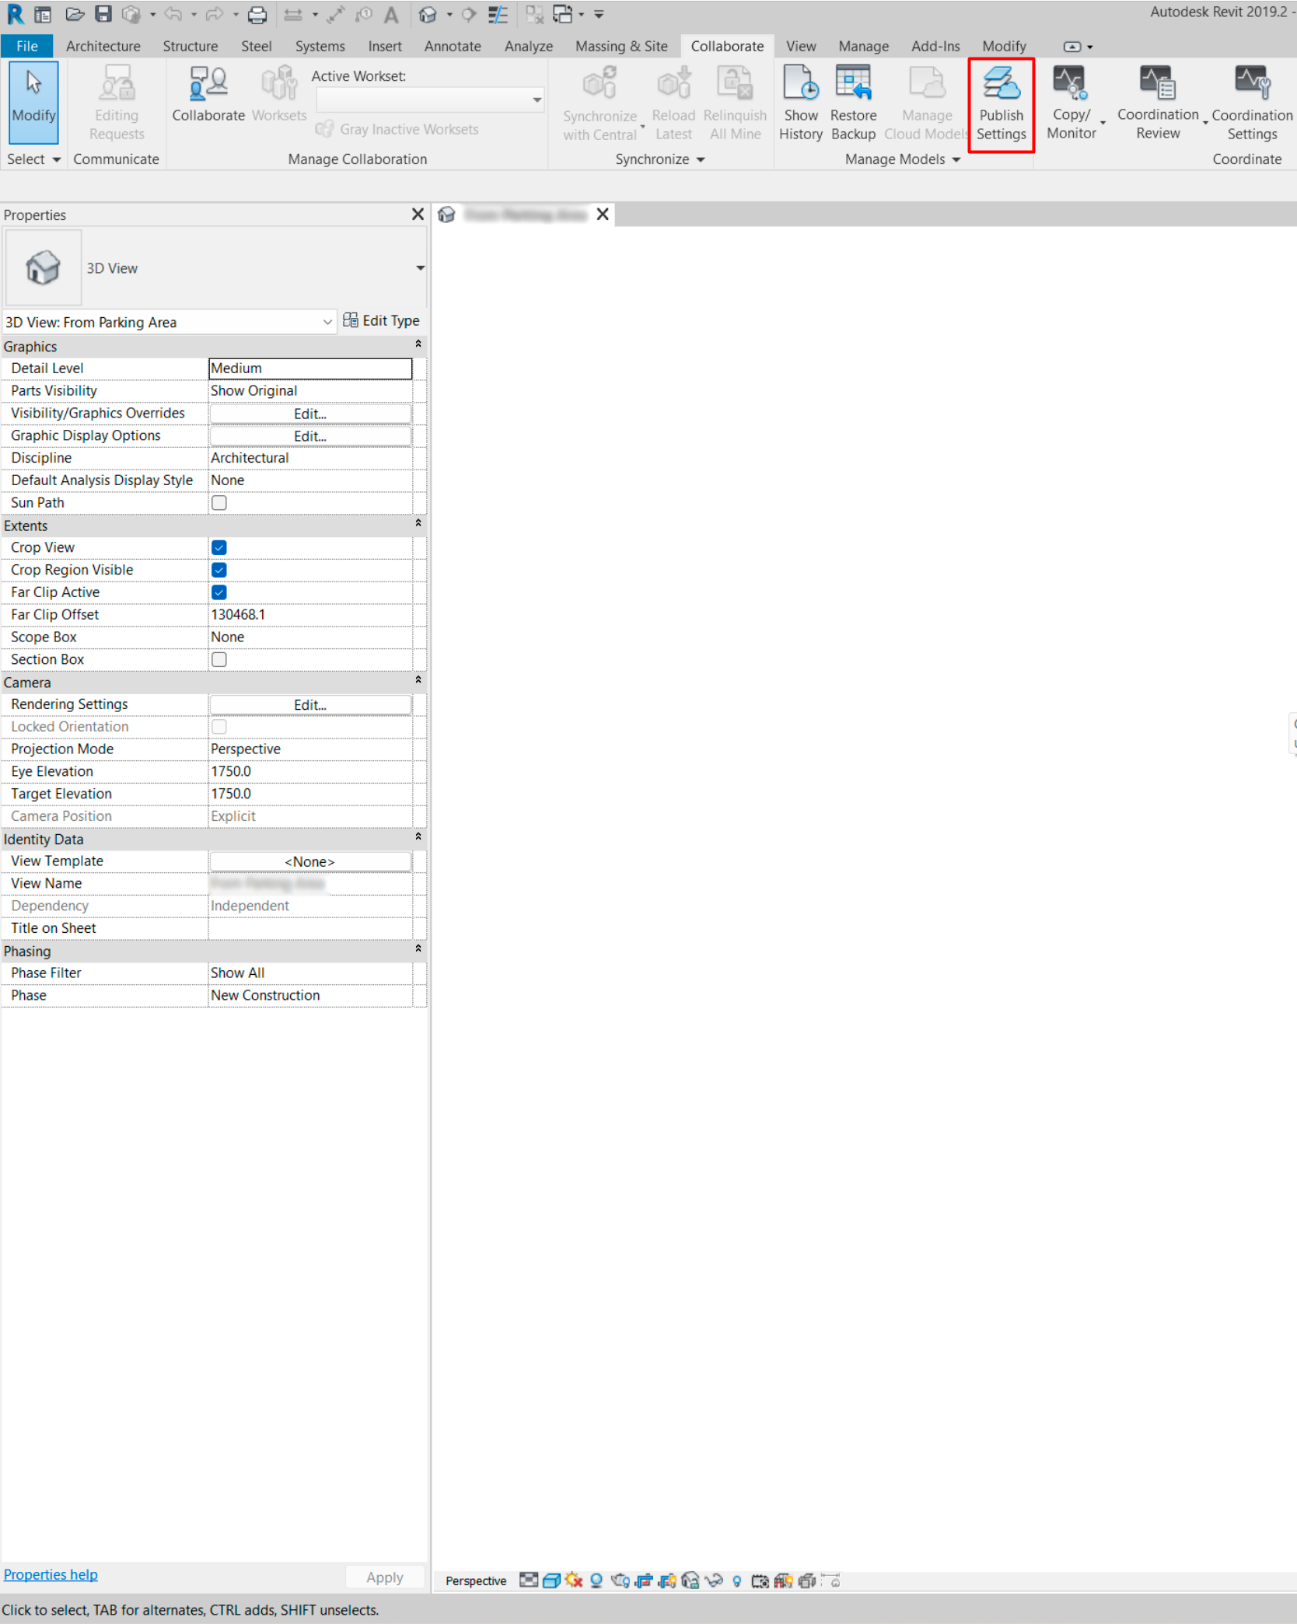 In the “Collaborate” tab of Revit, on the “Manage models” ribbon, select the “Publish settings” button.
Next, in the pop-up window, select the set in which the views or plans you want to visualize in BIM 360 are located. In the lower part of the window, you can select one by one.

11. Selection of plans and views to be published in BIM 360.
Once the “Save and close” button has been clicked, we can verify in BIM 360 that the selected plans and views are correctly displayed.
3. FILE UPLOAD TO ACC
3.1 SINGLE FILES
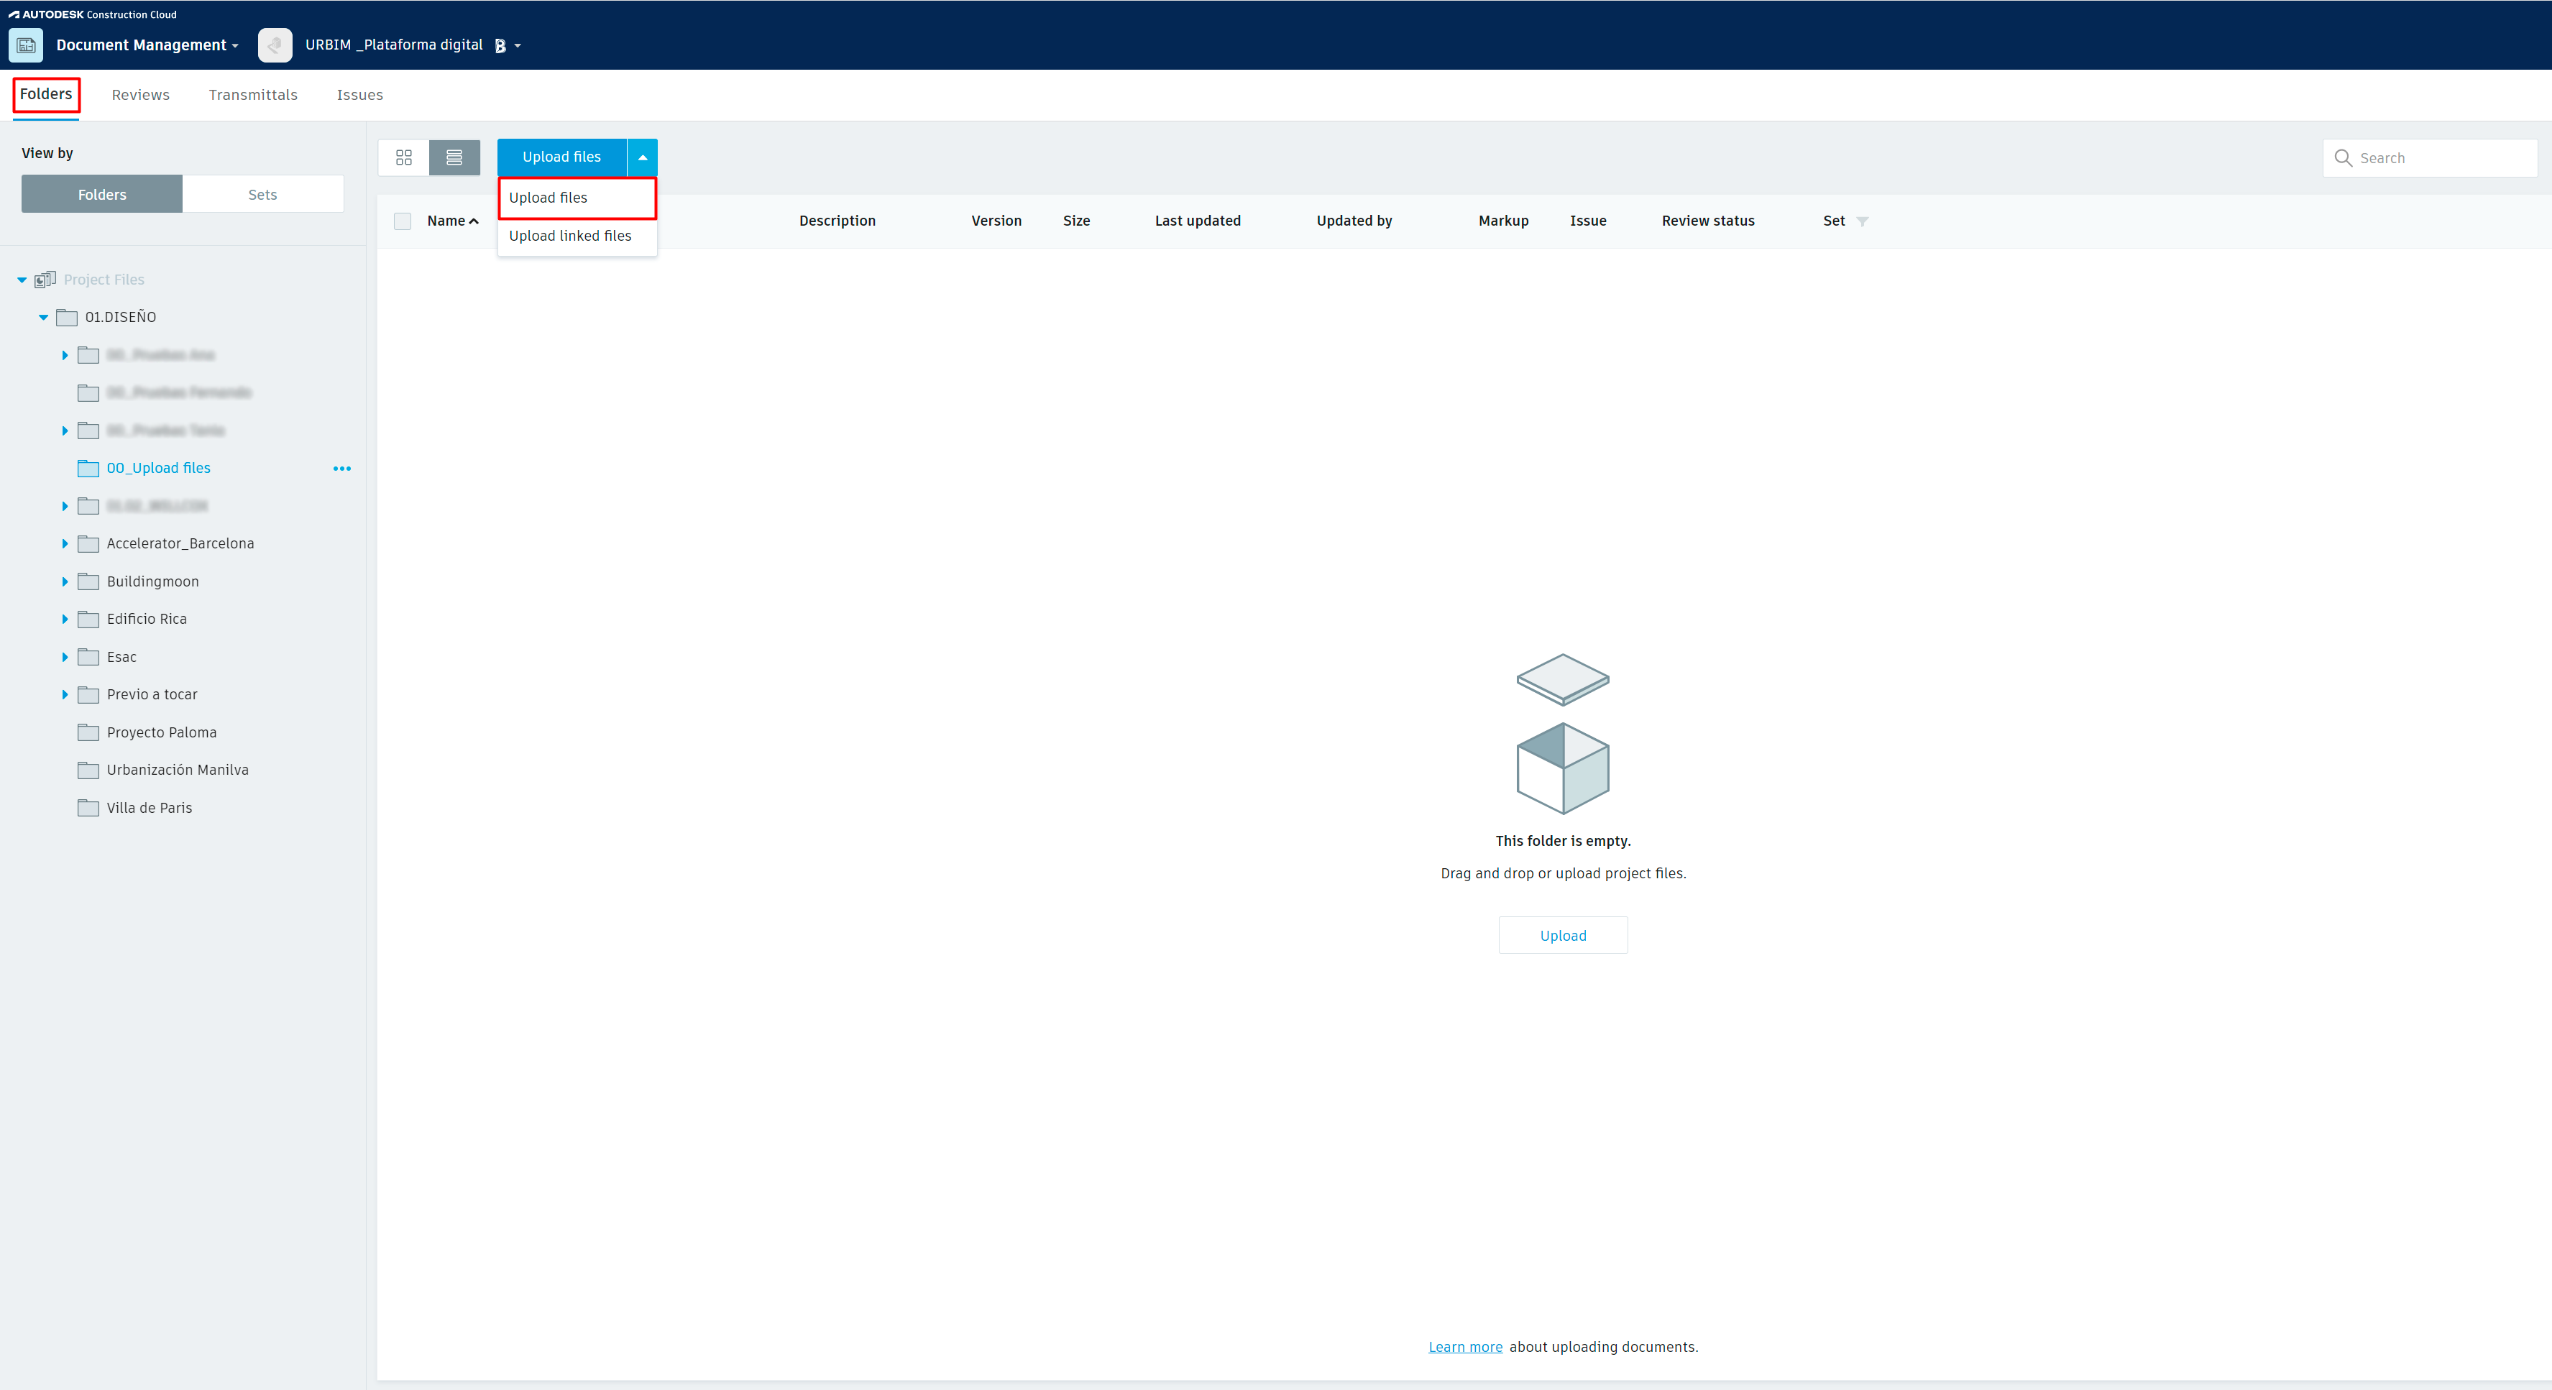
To upload one or more single files to Autodesk Construction Cloud, find the hub, the project and the folder where you want to upload the file(s), and click on the “Upload files” button.

12. Single files upload to ACC.
A pop-up browser window will then appear in which you can select the file(s) you want to upload.
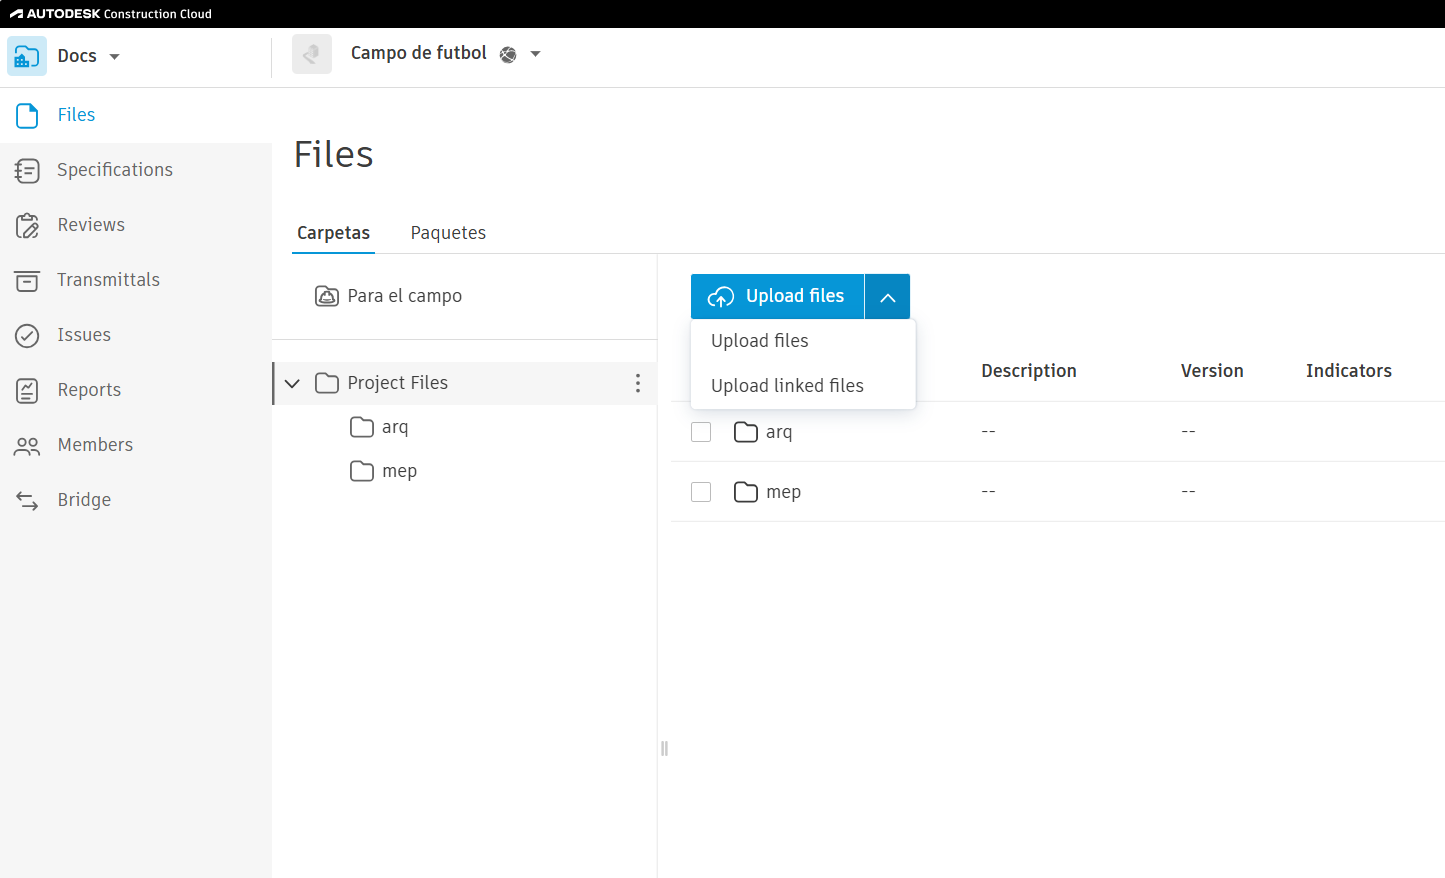
3.2 FILES WITH LINKED MODELS
If you want to upload the files to ACC maintaining the link relationship that you have in Revit, you must select the second option “Upload linked files”.
13. Uploading files with linked models to ACC.

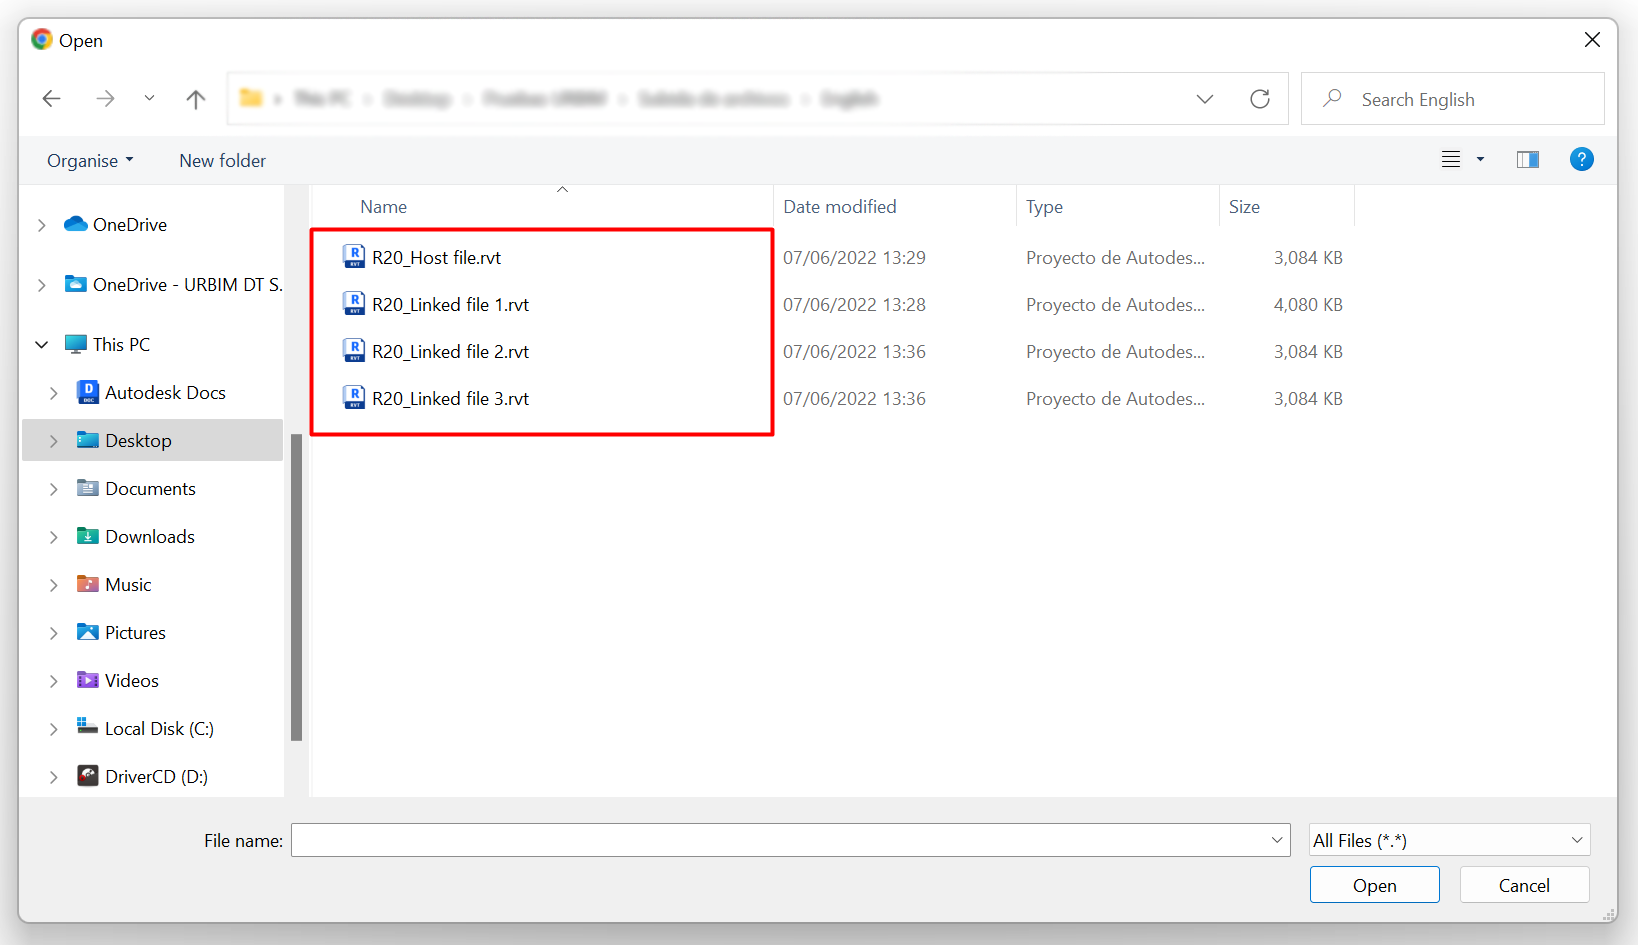
A pop-up browser window will appear in which we can choose all the files we want to upload. Select both the main file and the linked files.

14. Pop-up window for choosing files.
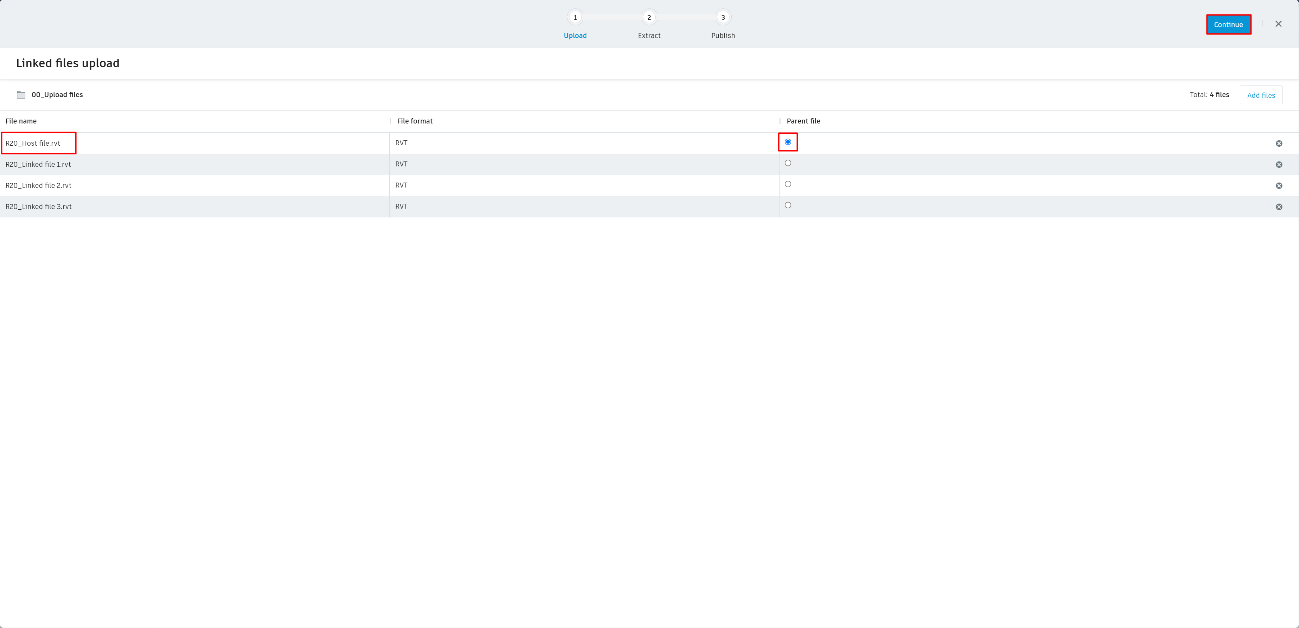
Once selected, we will see how they are loaded in the ACC pop-up window. Once loaded, we can select which is the main file, to which the other ones are linked, and continue with the load.
We continue through the steps of the wizard and, once the upload is finished, we will be able to visualize our uploaded files correctly in the selected folder. If we open the main file in the ACC viewer, we will see that the linked files are also loaded.
The linked files that are loaded in ACC as single files as in the previous section instead of being loaded this way, will not be recognized as linked models in URBIM, and therefore will not be displayed in the viewer when clicking on the parent file.
MODEL LOADING
URBIM DT S.L.

INDEX
1.2 FILES WITH LINKED MODELS 2
2. FILE UPLOAD TO BIM 360 IN COLLABORATIVE MODE FROM REVIT 4
2.2 PLANS AND VIEWS PUBLICATION 6
3.2 FILES WITH LINKED MODELS 8
1. FILE UPLOAD TO BIM 360
1.1 SINGLE FILES
To upload one or more single files to BIM 360, go to the “Folders” tab in the BIM 360 Document Manager section, find the hub, the project and the folder where you want to upload the file(s), and click on the “Upload files” button.
1. Single files upload to BIM360.
A pop-up browser window will then appear in which you can select the file(s) you want to upload.
1.2 FILES WITH LINKED MODELS
If you want to upload the files to BIM 360 maintaining the link relationship that you have in Revit, you must go to the “Folders” tab in the BIM 360 Document Manager section and select the second option “Upload linked files”.

2. Uploading files with linked models to BIM360.
A pop-up browser window will appear in which we can choose all the files we want to upload. Select both the main file and the linked files.
3. Pop-up window for choosing files.
Once selected, we will see how they are loaded in the BIM 360 pop-up window. Once loaded, we can select which is the main file, to which the other ones are linked, and continue with the load.
We continue through the steps of the wizard and, once the upload is finished, we will be able to visualize our uploaded files correctly in the selected folder. If we open the main file in the BIM 360 viewer, we will see that the linked files are also loaded.
The linked files that are loaded in BIM 360 as single files as in the previous section instead of being loaded this way, will not be recognized as linked models in URBIM, and therefore will not be displayed in the viewer when clicking on the parent file. Thus, it will only be possible to visualize linked models in URBIM by either this type of loading, or the collaborative loading process explained in the following section.
2. FILE UPLOAD TO BIM 360 IN COLLABORATIVE MODE FROM REVIT
2.1 MODEL PUBLICATION
If you want to work collaboratively in BIM 360 and publish the models directly from Revit, the procedure to be followed is:
 With the file to be shared open, from the “Collaborate” tab of Revit, in the “Manage collaboration” ribbon, select the “Collaborate” button to activate the collaborative work.
5. Collaborative work in Revit.
We choose the option to collaborate in BIM 360 so that the model is shared in the cloud and all project members with permissions can collaborate and keep track of the versions.

6. Connection to the BIM 360 cloud.
In the next step of the wizard, select the BIM 360 Hub, project and folder where you want to share the model.
7. BIM 360 hub and folder selection to upload the file to.

After a few minutes of processing and if the collaboration has been successfully initiated, the following pop-up window will appear:
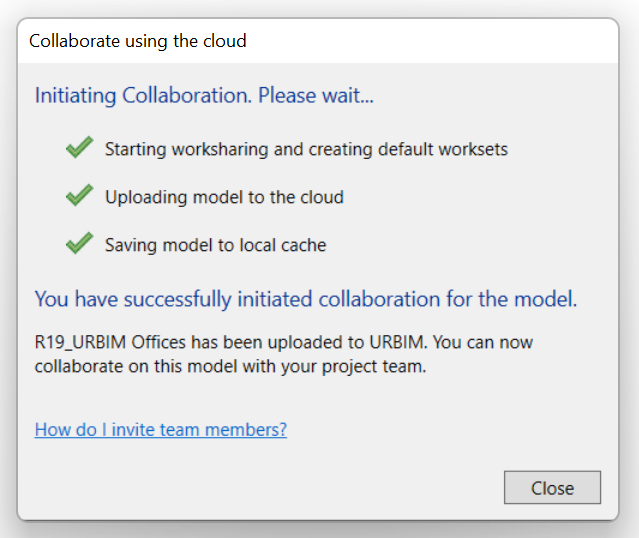
8. BIM 360 collaboration successfully initiated.
From that moment on, we will be able to verify that the model and version published in the project and the selected hub, appear correctly in BIM 360.
*
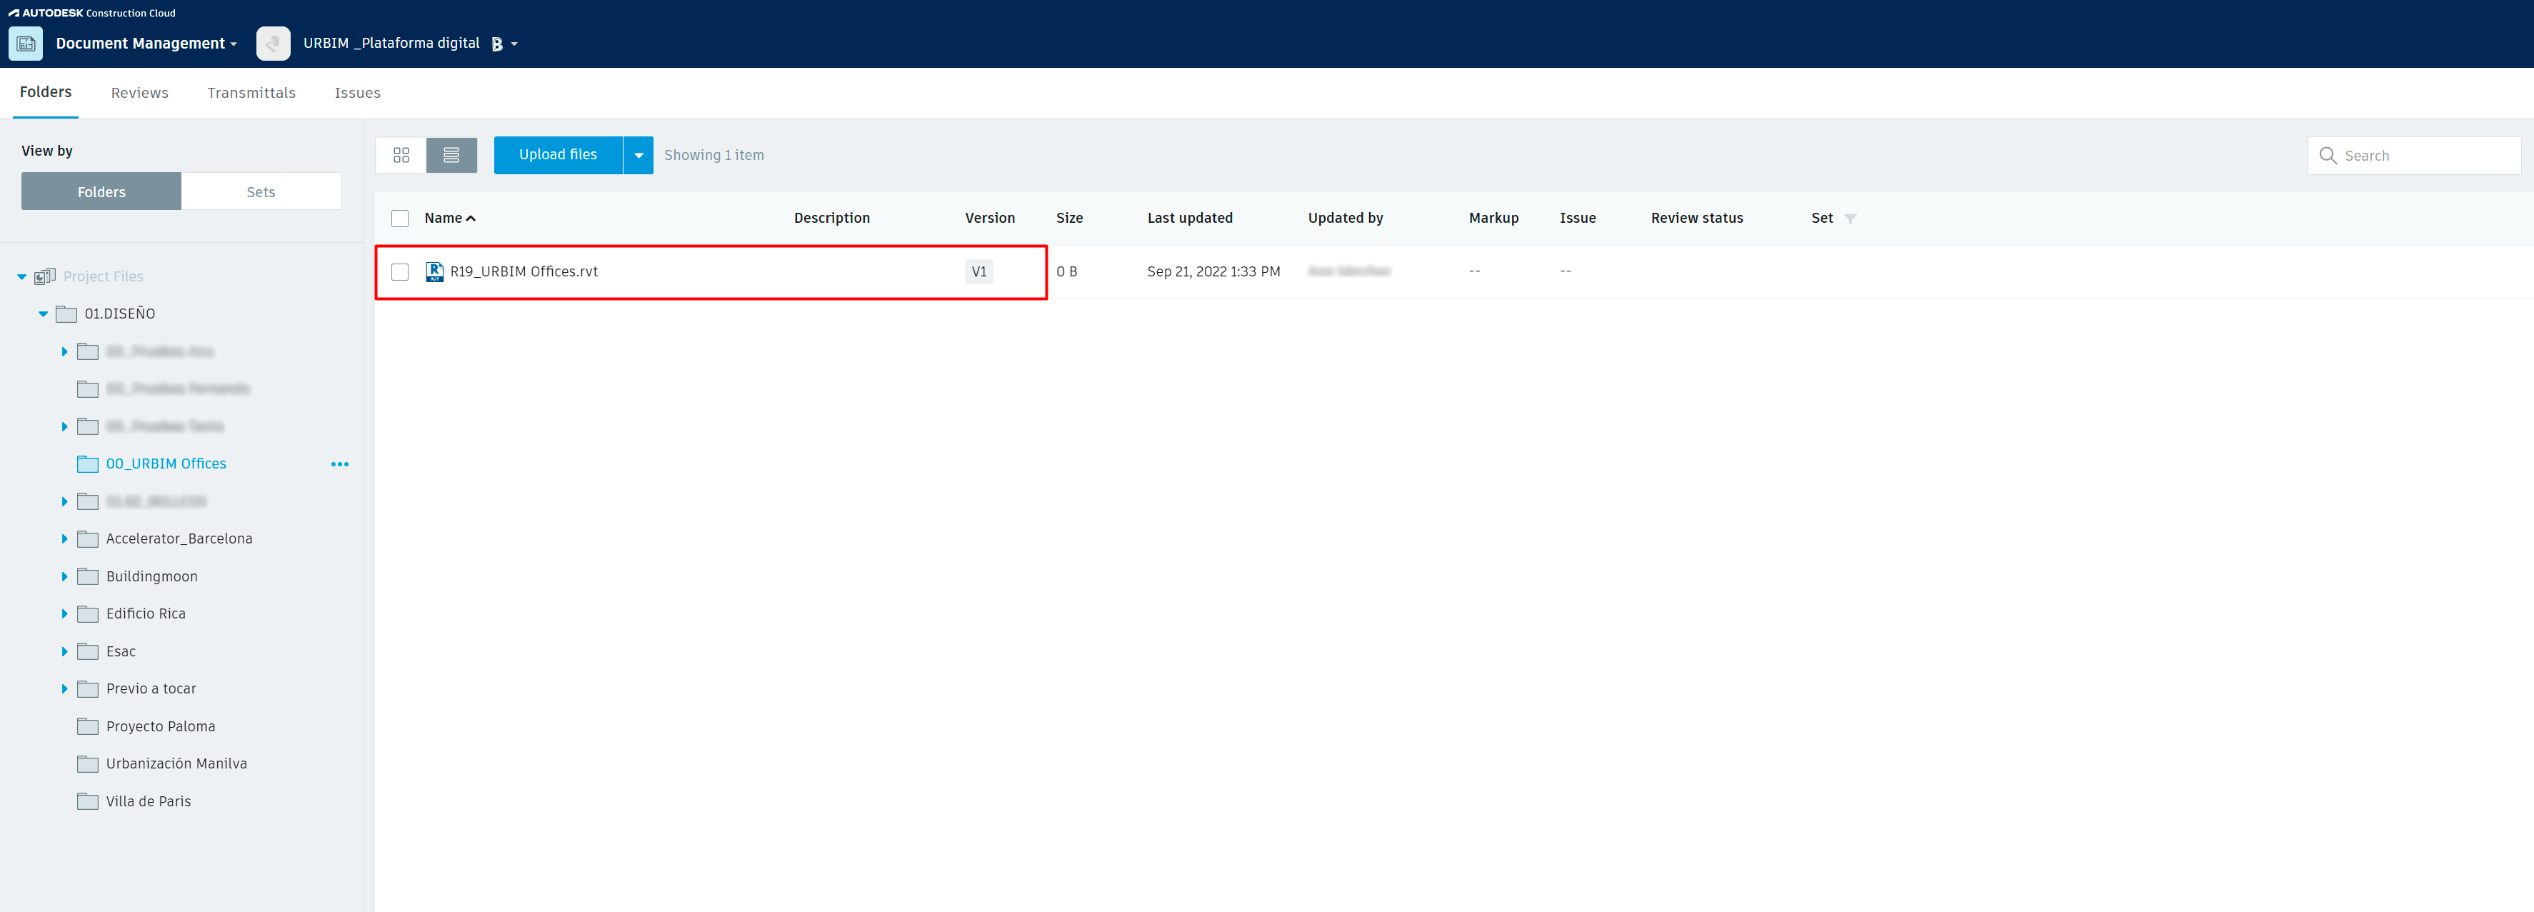
9. Verification in BIM 360 that the collaboration has been successfully initiated.
* It is important to mention that the current version of URBIM does not consider the updating of model versions; that is, if the file is updated in BIM 360 and later versions are published, they will not be visible in URBIM once the project is created. It will be necessary to create a new project with the corresponding loss of data that this may entail.
Improvement of model modification management is a feature that URBIM continues to work on and is scheduled for release in future updates of the platform.
2.2 PLANS AND VIEWS PUBLICATION
In order to be able to correctly visualize the plans and views of the file uploaded in BIM 360 and, consequently, in the URBIM viewer, it is necessary to publish them from Revit using the following procedure:
 In the “Collaborate” tab of Revit, on the “Manage models” ribbon, select the “Publish settings” button.
Next, in the pop-up window, select the set in which the views or plans you want to visualize in BIM 360 are located. In the lower part of the window, you can select one by one.
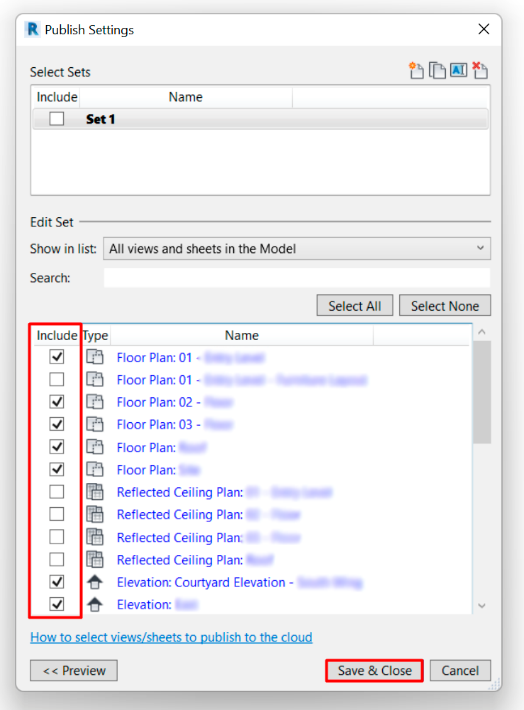
11. Selection of plans and views to be published in BIM 360.
Once the “Save and close” button has been clicked, we can verify in BIM 360 that the selected plans and views are correctly displayed.
3. FILE UPLOAD TO ACC
3.1 SINGLE FILES
To upload one or more single files to Autodesk Construction Cloud, find the hub, the project and the folder where you want to upload the file(s), and click on the “Upload files” button.

12. Single files upload to ACC.
A pop-up browser window will then appear in which you can select the file(s) you want to upload.
3.2 FILES WITH LINKED MODELS
If you want to upload the files to ACC maintaining the link relationship that you have in Revit, you must select the second option “Upload linked files”.
13. Uploading files with linked models to ACC.
A pop-up browser window will appear in which we can choose all the files we want to upload. Select both the main file and the linked files.

14. Pop-up window for choosing files.
Once selected, we will see how they are loaded in the ACC pop-up window. Once loaded, we can select which is the main file, to which the other ones are linked, and continue with the load.
We continue through the steps of the wizard and, once the upload is finished, we will be able to visualize our uploaded files correctly in the selected folder. If we open the main file in the ACC viewer, we will see that the linked files are also loaded.
The linked files that are loaded in ACC as single files as in the previous section instead of being loaded this way, will not be recognized as linked models in URBIM, and therefore will not be displayed in the viewer when clicking on the parent file.